I have been totally MIA on my blog as of late and I'm afraid it may stay this way for awhile.
Life is busy at work, Kade is busy at home and top it off I'm going to be starting a Yoga Teacher Training...so my crochet and blogging time is going to be nil, I'm afraid.
But there are Christmas gifts to be made and while the list isn't too long this year I have to get on it! So this weekend is devoted to making hand size evergreen trees that will be strung together to make buntings. 40 in total! I have some very dear ones who live far far away and I want to get their packages in the mail as soon as I can....so I need to crochet like a crazy lady!
Last night I was able to make 8 of them and I'm hoping to get about 20 done today! Don't worry, there will be pictures but if your interested in making trees too here is the link to the blog where they can be found! Fun blog and great pattern! Have it memorized now, so I'm just going to keep going with it!
Have a great sunday!

Showing posts with label gift idea. Show all posts
Showing posts with label gift idea. Show all posts
Sunday, November 20, 2011

Saturday, October 15, 2011
Tissue Box Covers!

I spent Friday night and Saturday morning wiping up these tissue box covers for the craft sale I'm doing in November. My mom loves them, what do you think?
They are super fun and easy to make....if your looking to make one yourself, I would suggest this pattern (you will need to have Ravelry to see it).
Hope your weekend crocheting is treating you well!
Melissa
Sunday, June 19, 2011
Gift Pictures!
Way way back in March, I shared some pictures of gifts I made for one of Kade's classmates and her mom recently sent me pictures her and her brother enjoying their gifts. Now I'm showing them off to you!

Here is lady Lucy wearing the crocheted crown I made her and using the sewing kit I put together...you can see the original posts here.

And John John, first thing in the morning wearing the garbage truck t-shirt I stenciled for him! So cute! You can find the original post here.

Here is lady Lucy wearing the crocheted crown I made her and using the sewing kit I put together...you can see the original posts here.

And John John, first thing in the morning wearing the garbage truck t-shirt I stenciled for him! So cute! You can find the original post here.
Sunday, June 12, 2011
Starburst Hotpad
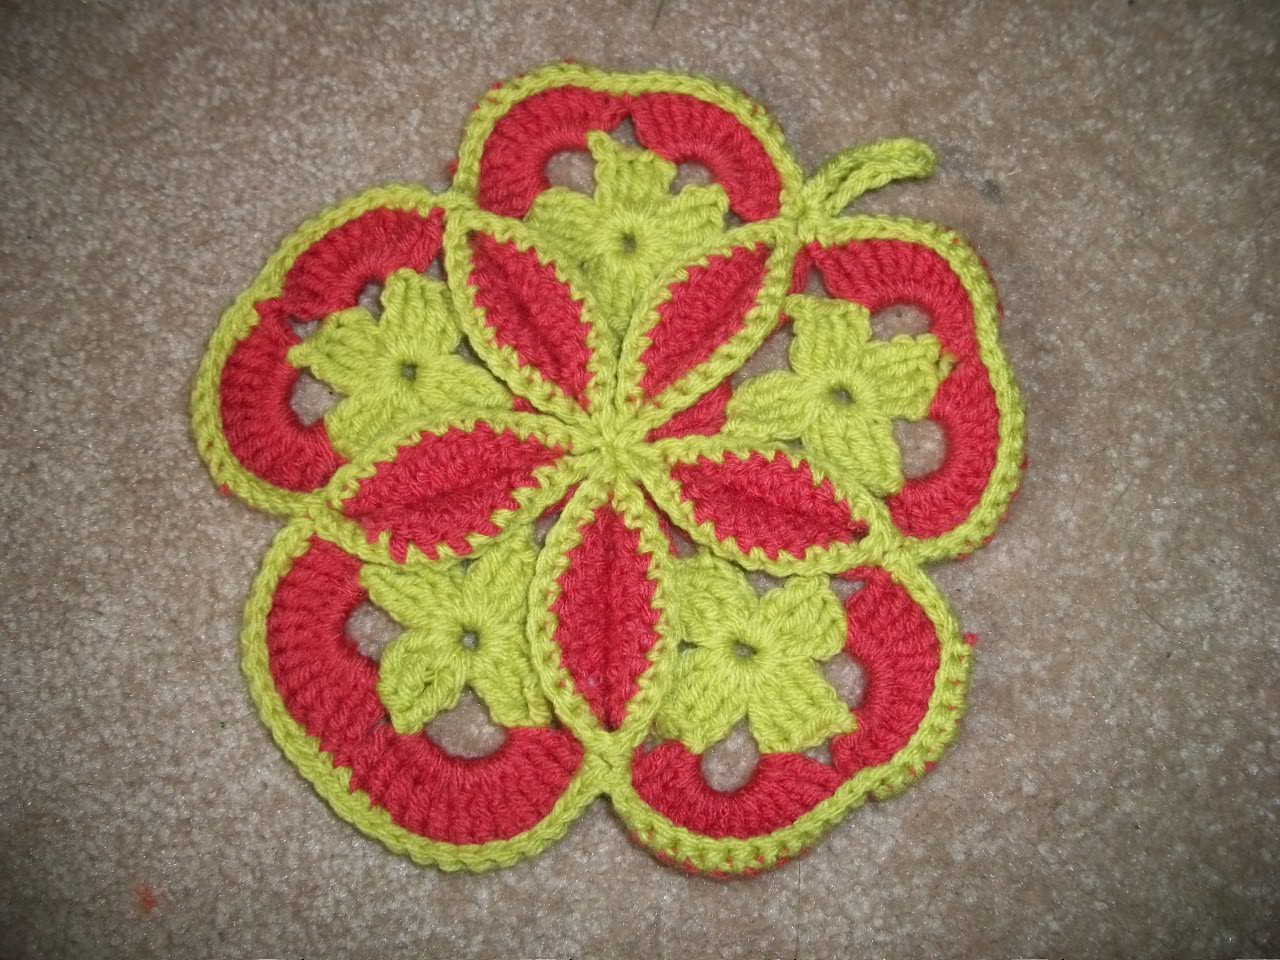
What a fun and interesting pattern!
I've been wanting to make this for awhile now but just from looking at it, I couldn't figure it out, so I've been avoiding it. I thought it was going to be much harder then it was....
It turned out amazing! I will make more....they would make great gifts and would go really nice with the xmas gifts I've already started.
If your interested in making this hotpad, and I strongly suggest that you do, you can find the pattern here....there is even a really great video tutorial!
Have a great Sunday,
m
Friday, April 8, 2011
Tutorial: Bee in Love Mason Jar Cover

We love bees in our household! I have had a strong connection to bees my whole life (the name Melissa literally means honey bee) and found a man with just as strong interest in them. We have since passed on that love to our little boy, who has almost no fear of bees and eats honey every night for dessert.
Not only are bees beautiful interesting little creatures that can teach us humans many things they are also necessary for the survival of humans. Bees (and other critters) are responsible for the pollination of almost everything we eat and, in my humble opinions, should be loved and celebrated.
I also have way to many mason jars in my home. While playing around on Ravelry around the holiday's I found this wonderful mason jar cover tutorial on Nature Nut Notes Blog. I made on that evening and have been making my own versions of them ever since.
So here is my ode to bees and mason jars, a great stash buster, that is pretty and functional. I picture fresh picked flowers pouring out of the one we now have and hope this projects inspires you and brings us that much closer to spring!
 What you will need: An old mason jar, small amount of yellow, white, black, pink (not shown) yarn and a size 4.5 mm crochet hook. Later you will also need a hot glue gun!
 With black yarn, chain enough to wrap snugly around your mason jar.
 Join with a slip stitch to form a loop, trying not to twist the chain. Chain 2. Make one double crochet in each chain space around. Join at the top of the chain with a slip stitch. Do no fasten off.
 Chain 2 with the yellow yarn. Make one double crochet in each double crochet of last round.
 At the end of the first yellow row, tie the ends from the yellow and black yarn tightly. Continue making 1 double crochet in each double crochet of the round before, alternating between yellow and black yarn, not cutting the yarn at the end of each row but drawing up the color needed.
 Stop when you have reached the top of the jar, where the jar starts to curve inward or as close as you can to the top with the yellow yarn.
 With the black yarn, work one row of single crochets. This row of single crochets will make the row tighter. Fasten off and weave in the ends. Your cover is now done!
 If you turn the cover inside out, you should be able to see the yarn you drew up with each row. (For some reason I love how neat and organized this is!)
 With the 4.5mm hook and the white yarn, chain 10. Make 2 double crochet (dc) in the 2nd chain from the hook.
 Half double crochet (hdc) in each ch to the end. Make 3 hdc in the last chain.
 Working along the other side of the ch, hdc to the end. (7 hdc)
 Make 2 more dc in the same space as the other dc from the beginning of row. Slip Stitch to join.
 Ch 2, 2 dc in the next dc, 1 dc. hdc in next 7, 2hd, 1hdc, 2 hdc. hdc in next 7 hdc along the other side. dc in first dc, 2 dc in next. Ss to join. Row 2 complete! Your wing will now start to curve...that's a good thing!
 For row 3, ch 3. 2 dc in the next dc, twice. 1 dc. 8 hdc across. 2 hdc in each if the next 3 st. 8 hdc along other side. 1 dc in next dc, 2 dc in each of next 2 dc, ss to join.
 Now make another one.....bees actually have 2 sets of wings but my son insisted that I only make 1 set!
This is a good time to make your heart! I make the medium sized heart by June over at PlanetJune. You can find the pattern here. I choose a bright pink but you can use what ever pink or red you have in your stash!
Now it is time to put this bee together! I folded my mason jar cover in half with the seam down the middle and facing the back. I then put a small piece of cardboard inside so the glue from the hot glue gun didn't sick to back of the cover.
 Lay out the wings where you want them, I put mine in the middle but you could put them higher or lower.
 Flip them over and put a small amount of hot glue on the smaller end (the end made up of hdc). I wanted my wings to flap, that's why I only put a small amount of glue. Do the same thing for the other wing, pushing down firmly!
 Ta Da!
 Cover the back of your heart with hot glue and place it on top of the wings in the center.
 You are done!
You could also sew on your wings is you do not have a hot glue gun but I'm a little obsessed with mine right now so I wanted to use it!
Now fill your jar with flowers or pencils or, as ours is currently being used for, paint brushes and enjoy!
Thanks for stopping by my blog! Hope to see you again soon!
Also, check out the link to Robins Blog....I'm featured over there!

Tuesday, March 8, 2011
Freezer Paper Stencils!
My mother in law dug up some freezer paper while we were at her house on the weekend and I got right to making stencils from it! Kade is in love with pirates, or so I'm told, so I printed off a pirate ship for him and cut out the stencil last night (along with my thumb!)
Then I found some more cheap shirts while out this morning, and whipped two more stencils this after work this afternoon. Kade is invited to a party this weekend so we did some pink butterflies for Lucy and a blue garbage truck for her garbage truck loving brother.
This was so easy to do! Honestly, it was much harder to find the freezer paper then it was to make the stencils and do the painting. If you're thinking of making your own stencils, there is a wonderful tutorial over on Made or give me a shout and I can whip something up for you.
Added my shirts to a linking party...if your coming from there, thanks for stopping by!

Here are the pictures to prove it!


Then I found some more cheap shirts while out this morning, and whipped two more stencils this after work this afternoon. Kade is invited to a party this weekend so we did some pink butterflies for Lucy and a blue garbage truck for her garbage truck loving brother.
This was so easy to do! Honestly, it was much harder to find the freezer paper then it was to make the stencils and do the painting. If you're thinking of making your own stencils, there is a wonderful tutorial over on Made or give me a shout and I can whip something up for you.
Added my shirts to a linking party...if your coming from there, thanks for stopping by!
Here are the pictures to prove it!


Sunday, February 27, 2011
On the mark....
Kade just finished the winter session of Cocoa Club at our local library and had such a great time! The kids get dropped off, get read to while enjoying warm cocoa and then do a related craft.
The parents, on the other hand, get to walk down to a local coffee shop and chat for an hour. I was perfect and I am so grateful that Kathy, one of our local librarians, let Kade participate (he is a little younger then recommended but a good kid).
As a thank you I made this book mark for Kathy, and it honestly turned out better then I thought it would. I hope she likes it and knows how much we love her!

The pattern for this book mark can be found here.
Subscribe to:
Posts (Atom)
